[I2C] 1602 LCD ディスプレイ (HD44780 + PCF8574A)
1602 LCD を I2C で接続してみます。
購入
1602 LCD (HD44780) は Amazon 等で購入できます (購入時価格: ¥190)。


[5V]
[3.3V]
1602 LCD を (普通に) Arduino に繋ぐやり方は UNO のチュートリアル Chapter 18 (Option): 1602LCD に詳細がありますが、今回は I2C 接続するので別途 I2C モジュールが必要となります。


I2C モジュールも Amazon 等で購入できます (購入時価格: ¥120)。このモジュールの型番は FC-113 のようです。また、ピンヘッダは最初から取り付けられています。モジュール自体は 3.3V でも 5V でも動作しますが、組み合わせる 1602 LCD の動作電圧に依存します。
LCD と I2C モジュールが最初から一緒になっている商品もあります。
各部詳細
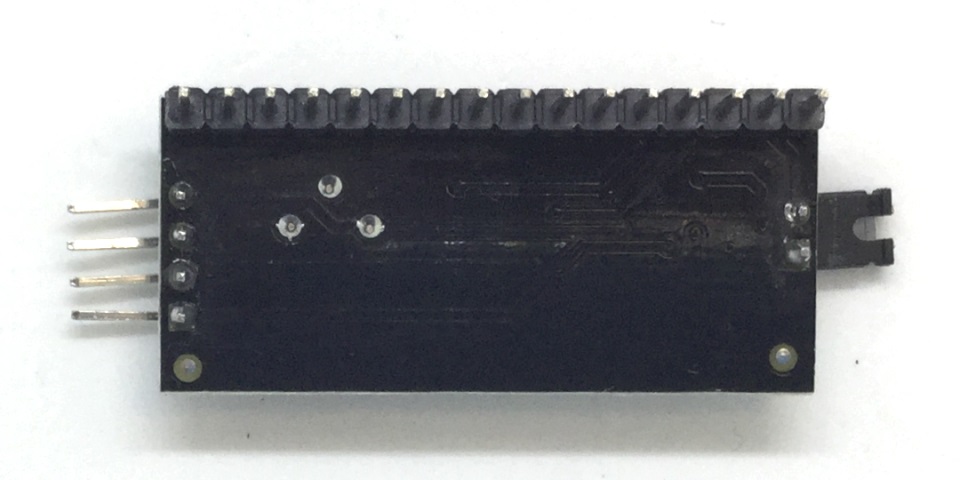
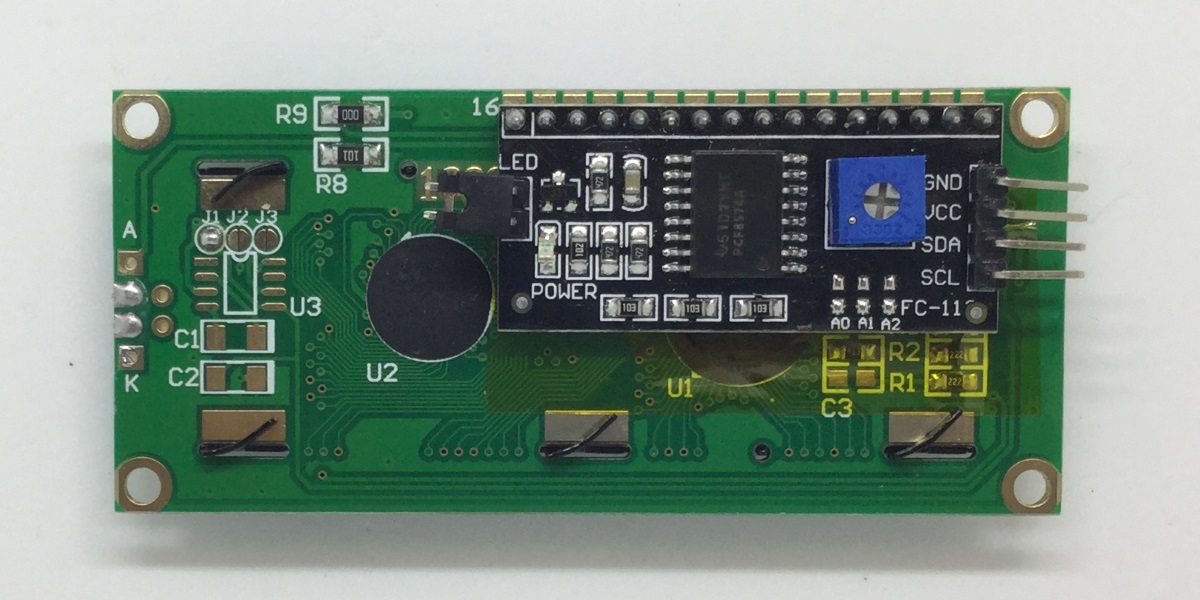
1602 LCD と I2C モジュールを合体させるとこうなります。1602 LCD 側にピンソケットを立てて着脱可能にしてもいいのでしょうが、安いので直接ハンダしました。ピンヘッダが長くてハンダ付けしにくいので、短く切り揃えてからハンダ付けするといいでしょう。ピンが接触しそうな箇所にはポリイミドテープを貼ってあります。

以下、I2C モジュールの詳細です。

- バックライトジャンパーを抜くとバックライトを消灯できます。
- 青い半固定抵抗は LCD のコントラスト調整用です。「何も表示されない!」と騒ぐ前にコントラストを調整してみましょう。
- 1602 LCD 用 I2C モジュールの I2C アドレスは 0x27 であると書かれているものが多いのですが、このモジュールは I/O エキスパンダに PCF8574A が使われており、デフォルトの I2C アドレスは 0x3F でした。
- ロットにより、PCF8574 が使われたり PCF8574A が使われたりしているのでしょうね。
接続された I2C 機器の I2C アドレスを知るには、playground.arduino にある ic2_scanner を使うと便利です。スケッチは短いので転載しておきます。
// --------------------------------------
// i2c_scanner
//
// Version 1
//    This program (or code that looks like it)
//    can be found in many places.
//    For example on the Arduino.cc forum.
//    The original author is not know.
// Version 2, Juni 2012, Using Arduino 1.0.1
//     Adapted to be as simple as possible by Arduino.cc user Krodal
// Version 3, Feb 26  2013
//    V3 by louarnold
// Version 4, March 3, 2013, Using Arduino 1.0.3
//    by Arduino.cc user Krodal.
//    Changes by louarnold removed.
//    Scanning addresses changed from 0...127 to 1...119,
//    according to the i2c scanner by Nick Gammon
//    http://www.gammon.com.au/forum/?id=10896
// Version 5, March 28, 2013
//    As version 4, but address scans now to 127.
//    A sensor seems to use address 120.
// Version 6, November 27, 2015.
//    Added waiting for the Leonardo serial communication.
//
//
// This sketch tests the standard 7-bit addresses
// Devices with higher bit address might not be seen properly.
//

#include <Wire.h>


void setup()
{
  Wire.begin();

  Serial.begin(9600);
  while (!Serial);             // Leonardo: wait for serial monitor
  Serial.println("\nI2C Scanner");
}


void loop()
{
  byte error, address;
  int nDevices;

  Serial.println("Scanning...");

  nDevices = 0;
  for(address = 1; address < 127; address++ )
  {
    // The i2c_scanner uses the return value of
    // the Write.endTransmisstion to see if
    // a device did acknowledge to the address.
    Wire.beginTransmission(address);
    error = Wire.endTransmission();

    if (error == 0)
    {
      Serial.print("I2C device found at address 0x");
      if (address<16)
        Serial.print("0");
      Serial.print(address,HEX);
      Serial.println("  !");

      nDevices++;
    }
    else if (error==4)
    {
      Serial.print("Unknown error at address 0x");
      if (address<16)
        Serial.print("0");
      Serial.println(address,HEX);
    }
  }
  if (nDevices == 0)
    Serial.println("No I2C devices found\n");
  else
    Serial.println("done\n");

  delay(5000);           // wait 5 seconds for next scan
}
|
I2C アドレス設定用ジャンパーの値は以下の通りです。パッドをハンダブリッジしてアドレスを設定します。
| 0x27 |
0x3F |
OFF |
OFF |
OFF |
| 0x26 |
0x3E |
ON |
OFF |
OFF |
| 0x25 |
0x3D |
OFF |
ON |
OFF |
| 0x24 |
0x3C |
ON |
ON |
OFF |
| 0x23 |
0x3B |
OFF |
OFF |
ON |
| 0x22 |
0x3A |
ON |
OFF |
ON |
| 0x21 |
0x39 |
OFF |
ON |
ON |
| 0x20 |
0x38 |
ON |
ON |
ON |
I2C アドレスをずらせば、理論上は 8 台の 1602 LCD を同時に制御できます。
See Also:
動作確認
Arduino (UNO) との接続は以下のようになります。
| GND |
1 GND |
GND |
| VCC |
2 VCC |
5V |
| SDA |
3 SDA |
A4 |
| SCL |
4 SCL |
A5 |
4 本だけの接続なので簡単ですね。
LiquidCrystal I2C ライブラリ
[スケッチ | ライブラリをインクルード | ライブラリを管理] でライブラリマネージャを開き、"LiquidCrystal I2C" を検索し、"LiquidCrystal I2C by Frank de Brabander" となっているものをインストールします。

サンプルスケッチは [ファイル | スケッチ例 | LiquidCrystal I2C] にありますが、2004 LCD 用なのでそのままではちゃんと動きません。以下のスケッチを使ってみてください。
#include <Wire.h>
#include <LiquidCrystal_I2C.h>

LiquidCrystal_I2C lcd(0x3F, 16, 2); // I2C: 0x3F, 16x2 LCD

void setup() {
  lcd.init();
  lcd.backlight();
  lcd.setCursor(0, 0);
  lcd.print("Hello, world!");
  lcd.setCursor(0, 1);
  lcd.print("Arduino!");
}

void loop() {
}
|
コンパイルして実行すると "Hello, world!" が表示されます。このライブラリを AVR 以外のマイコンで使うとワーニングが出ますが、標準の I2C ポートを使う限り正しく動作すると思われます。

Arduino との接続には オス<->メスのジャンパーワイヤーが必要な事に注意してください。
See Also:
ここにある情報が役に立って、「調べる手間が省けたからオマイに飯でもおごってやるよ」 というハートウォーミングな方がいらっしゃいましたら、下のボタンからどうぞ。